10-Move Full-Body Workout at Home

This workout routine is designed to target various muscle groups, providing an effective full-body workout within the comfort of your home. It emphasizes strength, endurance, and flexibility through a series of ten diverse exercises.
Equipment Needed:
- Yoga mat or comfortable surface
- Set of dumbbells (optional, for added resistance)
Workout Routine:
Perform each exercise for 3 sets with 10-12 repetitions per set, resting for 30-60 seconds between sets.
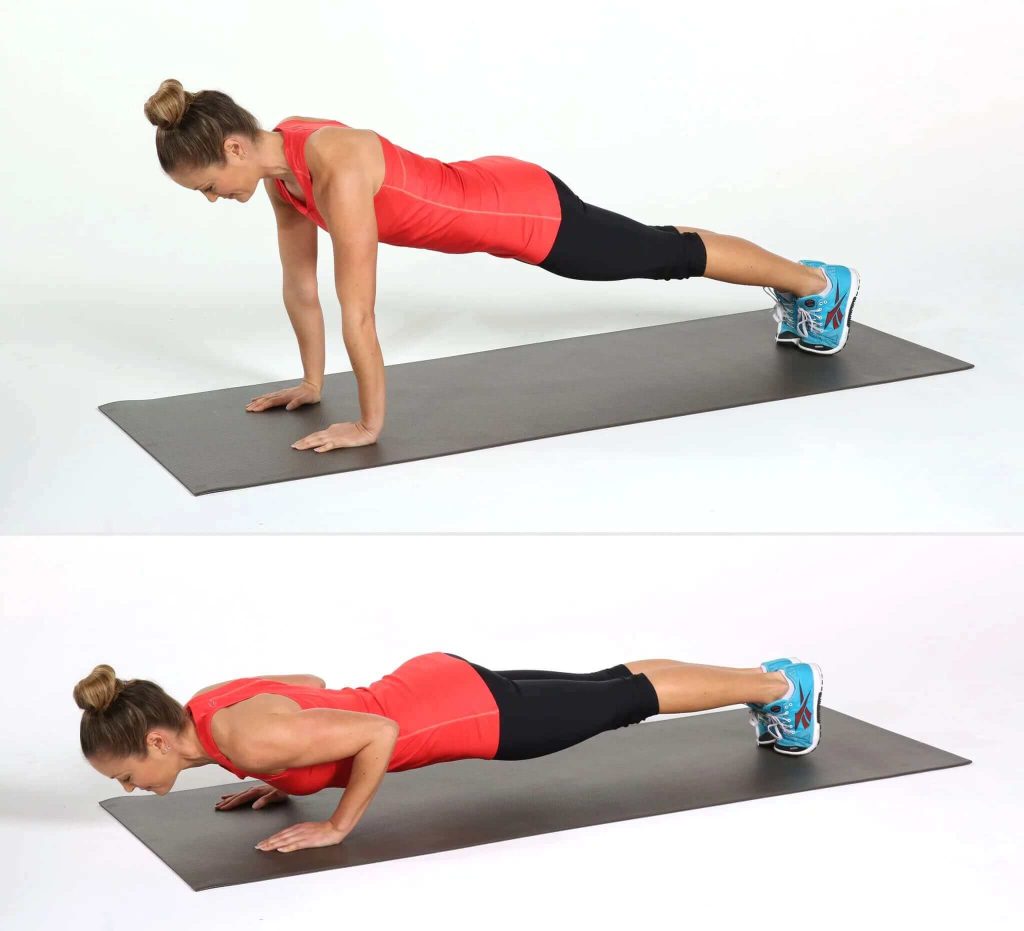
1. Push-Ups:
Targeted Muscles: Chest, Shoulders, Triceps
Instructions:
- Starting Position: Begin in a plank position with your hands slightly wider than shoulder-width apart, palms flat on the floor. Keep your body in a straight line from head to heels, engaging your core muscles.
- Execution:
- Lowering Phase: Lower your body towards the floor by bending your elbows. Keep your elbows close to your body at around a 45-degree angle. Maintain a straight back and avoid sagging your hips.
- Lower until your chest is close to or gently touches the floor, while keeping your head aligned with your spine and looking slightly forward.
- Pushing Phase: Push through your palms and straighten your arms, returning to the starting position. Fully extend your arms without locking your elbows at the top.
Tips:
- Ensure proper body alignment throughout the movement. Your body should form a straight line from head to heels.
- Engage your core muscles to maintain stability and prevent your lower back from sagging.
- Keep a controlled pace throughout the exercise, both on the descent and ascent.
- Modify as needed: If regular push-ups are challenging, perform them on your knees or against an elevated surface like a bench or countertop to reduce the intensity.
Variations:
- Wide Grip Push-Ups: Place your hands wider than shoulder-width apart to target your chest muscles more intensely.
- Diamond Push-Ups: Position your hands close together in a diamond shape under your chest to emphasize triceps engagement.
- Decline Push-Ups: Elevate your feet on a sturdy surface to shift more weight to your upper chest and shoulders.
2. Squats:
Targeted Muscles: Quadriceps, Hamstrings, Glutes
Instructions:
- Starting Position: Stand with your feet slightly wider than shoulder-width apart, toes pointing slightly outward. Keep your back straight, chest up, and engage your core muscles for stability.
- Execution:
- Lowering Phase: Initiate the squat by bending your knees and hips simultaneously. Lower your body as if you’re sitting back into an imaginary chair. Keep your weight on your heels and ensure your knees track in line with your toes (avoid letting them collapse inward).
- Descend until your thighs are at least parallel to the floor or go as low as comfortable, ensuring your torso remains upright and your knees don’t extend past your toes.
- Ascending Phase: Press through your heels, engage your quadriceps, hamstrings, and glutes, and push yourself back up to the starting position.
Tips:
- Maintain a neutral spine throughout the movement. Avoid rounding or arching your back excessively.
- Keep your chest lifted and shoulders relaxed.
- Engage your core muscles to stabilize your body and prevent your lower back from arching excessively.
- Ensure your knees align with your feet and don’t collapse inward during the squat.
- Start with bodyweight squats and gradually add resistance using dumbbells or a barbell as you become more comfortable with the movement.
Variations:
- Sumo Squats: Widen your stance significantly with toes pointing outward to engage inner thigh muscles more intensely.
- Pulse Squats: Perform small pulses at the bottom of the squat to increase time under tension and intensify the exercise.
- Jump Squats: Add explosiveness by jumping explosively from the squat position and landing softly back into the squat.

3. Plank:
Targeted Muscles: Core Muscles (Rectus Abdominis, Transverse Abdominis), Shoulders, Back
Instructions:
- Starting Position: Begin by getting into a push-up position, with your hands placed directly under your shoulders. Your body should form a straight line from head to heels, and your feet should be hip-width apart. Engage your core muscles.
- Execution:
- Hold this position by supporting your body weight on your forearms and toes. Keep your elbows bent at 90 degrees, and ensure your body remains in a straight line without sagging or lifting your hips too high.
- Focus on contracting your abdominal muscles and maintaining a tight core throughout the exercise. Keep your neck in line with your spine, looking down at the floor to prevent straining your neck.
Tips:
- Maintain a neutral spine and avoid arching or rounding your back.
- Engage your glutes and leg muscles to stabilize your body.
- Breathe steadily throughout the exercise; avoid holding your breath.
- Start by holding the plank position for as long as you can maintain proper form, aiming to increase duration gradually over time.
Variations:
- Forearm Plank: Support your body weight on your forearms instead of your hands, keeping your elbows directly under your shoulders.
- Side Plank: Rotate your body sideways, supporting yourself on one forearm and the side of your feet, stacking your feet and hips, and holding a straight line from head to heels on your side.
- Plank with Leg Lifts: While in the plank position, alternate lifting one leg at a time a few inches off the ground, engaging your core to maintain stability.

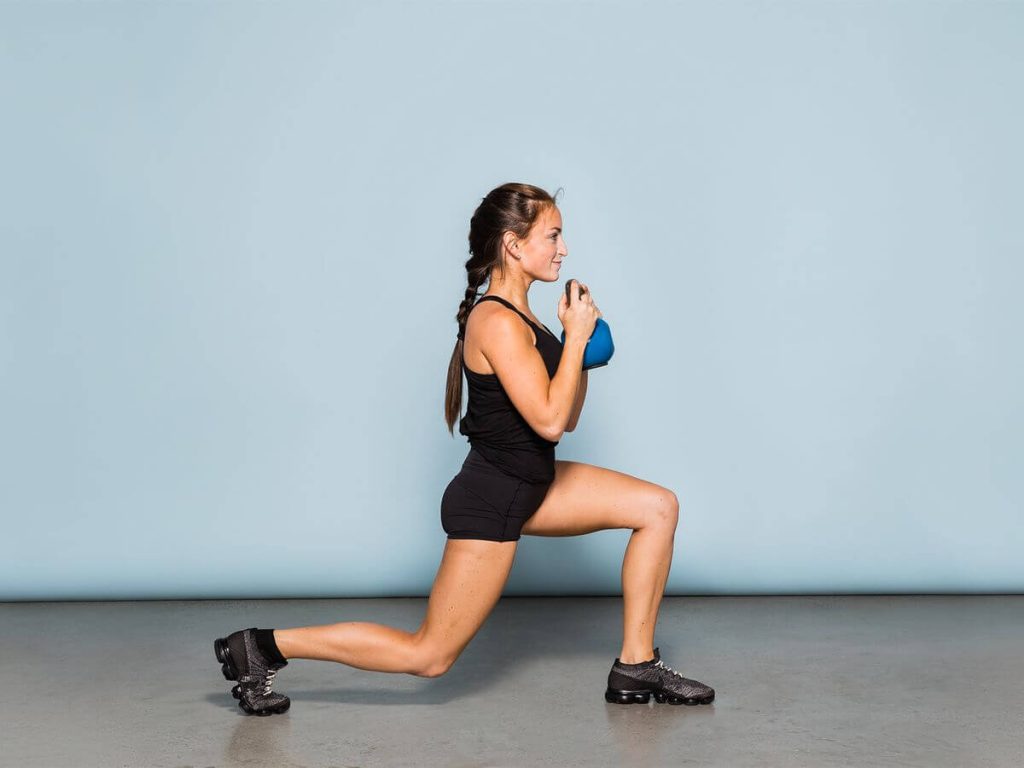
4. Lunges:
Targeted Muscles: Quadriceps, Hamstrings, Glutes
Instructions:
- Starting Position: Stand tall with your feet hip-width apart. Keep your upper body straight, shoulders relaxed, and engage your core muscles for stability.
- Execution:
- Forward Lunges:
- Take a step forward with one leg, lowering your hips until both knees are bent at about a 90-degree angle. Your front knee should align with your ankle, and your back knee should hover just above the ground.
- Ensure your torso remains upright, and your weight is distributed evenly between both legs.
- Reverse Lunges:
- Step backward with one leg, lowering your hips until both knees are bent. The front knee should be aligned with the ankle, and the back knee should almost touch the ground.
- Keep your chest lifted and maintain a straight spine throughout the movement.
- Walking Lunges:
- Alternately step forward with one leg and perform a lunge, then bring your back foot forward to meet the front foot and repeat the lunge motion with the opposite leg.
- Forward Lunges:
- Return to Starting Position: Push through your front heel to return to the starting position and repeat the movement, alternating legs.
Tips:
- Maintain proper form with a straight upper body and avoid leaning too far forward.
- Keep your front knee aligned with your ankle to prevent excessive stress on the knee joint.
- Engage your core muscles to stabilize your body and maintain balance.
- Avoid letting your front knee extend beyond your toes during the lunge motion.
Variations:
- Jumping Lunges: Add explosiveness by jumping between lunges, switching legs mid-air.
- Lunge Pulses: Perform small, controlled pulses at the bottom of the lunge to increase time under tension and intensify the exercise.
5. Dumbbell Rows:
Targeted Muscles: Upper Back (Latissimus Dorsi), Rhomboids, Biceps
Instructions:
- Starting Position: Stand with your feet shoulder-width apart, holding a dumbbell in each hand. Hinge at the hips to bend forward, keeping your back flat and almost parallel to the ground. Let the dumbbells hang directly beneath your shoulders with your arms fully extended towards the floor.
- Execution:
- Lifting Phase:
- Pull the dumbbells towards your hips by bending your elbows, keeping them close to your body. Focus on driving your elbows backward and squeezing your shoulder blades together at the top of the movement.
- Keep your torso steady and avoid excessive swinging or rotating.
- Lowering Phase:
- Slowly lower the dumbbells back to the starting position with controlled movement, allowing your arms to fully extend but keeping tension in your back muscles.
- Lifting Phase:
- Repeat: Perform the desired number of repetitions for each arm, alternating sides if doing single-arm rows.
Tips:
- Maintain a flat back and avoid arching or rounding your spine.
- Keep your neck aligned with your spine, looking down at the floor to prevent straining your neck.
- Engage your core muscles for stability throughout the exercise.
- Control the movement both while lifting and lowering the dumbbells to maximize effectiveness.
Variations:
- Single-Arm Dumbbell Rows: Perform the exercise one arm at a time while supporting your non-working arm on a bench or other stable surface for added stability.
- Wide-Grip Rows: Hold the dumbbells with a wider grip to engage different parts of the back muscles.

6. Mountain Climbers:
Targeted Muscles: Core Muscles, Shoulders, Legs
Instructions:
- Starting Position: Begin in a plank position with your hands placed directly under your shoulders and your body forming a straight line from head to heels. Engage your core muscles and keep your shoulders, hips, and feet in alignment.
- Execution:
- Drive Knee Towards Chest:
- While maintaining the plank position, draw one knee towards your chest by flexing your hip and bending your knee. Keep your foot off the ground.
- Alternate legs by swiftly returning one leg to the starting position while bringing the other knee towards the chest in a continuous, rhythmic motion.
- Pace and Breathing:
- Perform the movement at a pace that challenges you, maintaining a steady and controlled rhythm.
- Breathe naturally throughout the exercise, coordinating your breath with the movement.
- Drive Knee Towards Chest:
- Repeat: Continue alternating leg movements for the desired duration or number of repetitions.
Tips:
- Maintain proper plank form throughout the exercise, keeping your core engaged and hips stable.
- Keep your shoulders positioned directly over your wrists to avoid unnecessary strain.
- Move at a pace that allows you to maintain proper form and control.
Variations:
- Cross-Body Mountain Climbers: Bring your knee towards the opposite elbow, engaging obliques for an additional challenge.
- Slow-Motion Mountain Climbers: Perform the exercise at a slower pace, emphasizing control and muscle engagement.

7. Russian Twists:
Targeted Muscles: Obliques, Core Muscles
Instructions:
- Starting Position: Sit on the floor with your knees bent, feet flat on the ground, and your torso leaned back slightly at about a 45-degree angle. Clasp your hands together or hold a weight (optional) with both hands in front of your chest.
- Execution:
- Twisting Motion:
- Engage your core muscles and twist your torso to the right, bringing your clasped hands or the weight towards the floor next to your right hip.
- Return to the center and then twist your torso to the left, bringing your hands or the weight towards the floor next to your left hip.
- Breathing and Control:
- Exhale as you twist from side to side, and inhale as you return to the center position.
- Focus on maintaining control throughout the movement and avoid rushing through the exercise.
- Twisting Motion:
- Repeat: Alternate twisting from side to side for the desired duration or number of repetitions.
Tips:
- Keep your feet planted firmly on the ground and your back straight throughout the exercise.
- Engage your core muscles to stabilize your body and support the twisting motion.
- Twist your torso fully from side to side while keeping your head and neck aligned with your spine.
Variations:
- Weighted Russian Twists: Hold a weight (dumbbell, medicine ball, or plate) in front of your chest to increase resistance and intensify the exercise.
- Feet Elevated Russian Twists: Elevate your feet off the ground to engage the core more intensely.

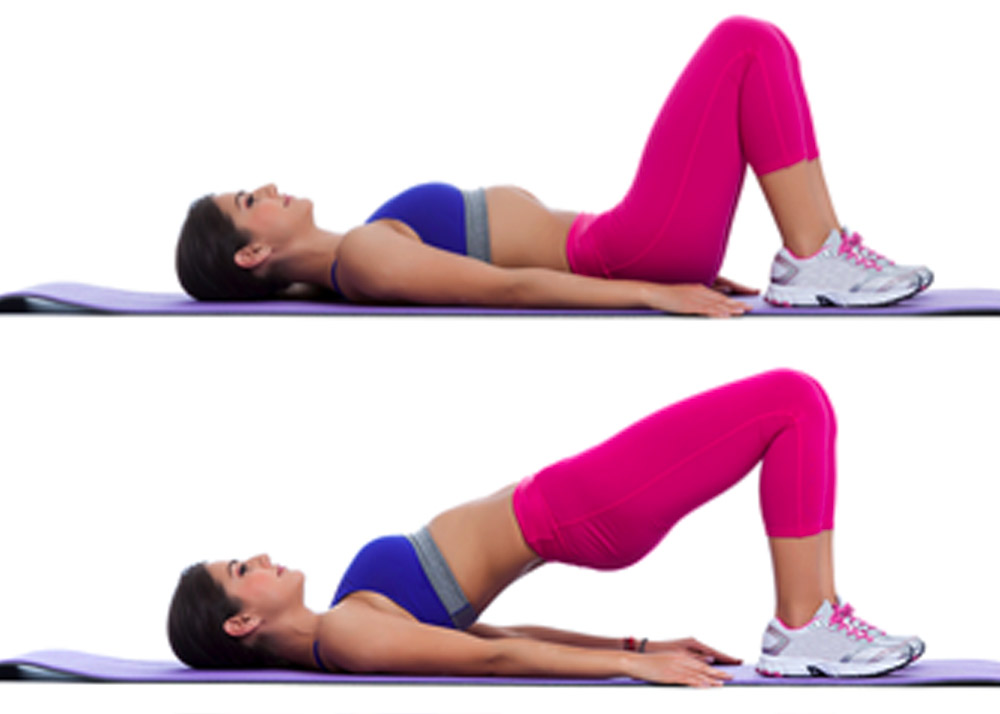
8. Glute Bridges:
Targeted Muscles: Glutes, Hamstrings, Lower Back
Instructions:
- Starting Position: Lie on your back on the floor or a mat with your knees bent, feet flat on the ground, and arms resting by your sides. Ensure your feet are hip-width apart and close to your glutes.
- Execution:
- Lifting Phase:
- Engage your core muscles and press through your heels to lift your hips off the ground, driving them upward towards the ceiling.
- Squeeze your glutes at the top of the movement, aiming to form a straight line from your shoulders to your knees.
- Lowering Phase:
- Slowly lower your hips back down to the starting position while maintaining control and tension in your glutes and hamstrings.
- Lifting Phase:
- Repeat: Perform the desired number of repetitions while focusing on proper form and muscle engagement.
Tips:
- Keep your feet firmly planted on the ground throughout the exercise, and distribute your weight evenly across both feet.
- Engage your core muscles to stabilize your pelvis and avoid arching your lower back excessively.
- Avoid pushing your hips too high, aiming for a straight line from shoulders to knees at the top of the movement.
Variations:
- Single-Leg Glute Bridges: Lift one leg off the ground while performing the exercise with the other leg, intensifying the workload on one side at a time.
- Weighted Glute Bridges: Place a weight (such as a barbell or dumbbell) on your hips to increase resistance and challenge the glute muscles further.
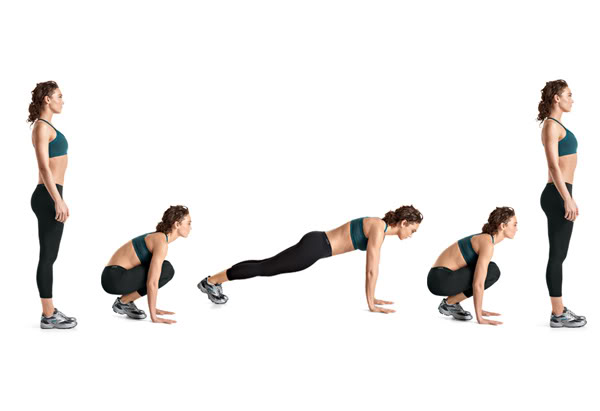
9. Burpees:
Targeted Muscles: Full Body, Cardiovascular Endurance
Instructions:
- Starting Position: Stand with your feet shoulder-width apart, arms by your sides.
- Execution:
- Squat Position:
- Lower your body into a squat position by bending your knees and placing your hands on the floor in front of you. Your hands should be shoulder-width apart.
- Ensure your back remains straight, and your core muscles are engaged.
- Jump Back to Plank:
- Quickly jump both feet backward into a plank position, landing softly and maintaining a straight line from head to heels.
- Push-Up (Optional):
- Perform a push-up by bending your elbows and lowering your body towards the ground. You can skip the push-up if needed or perform a modified version on your knees.
- Jump Forward to Squat:
- Jump both feet back towards your hands, returning to the squat position.
- Jump Upward:
- Explosively jump into the air, reaching your arms overhead.
- Land softly and prepare to immediately transition into the next repetition.
- Squat Position:
- Repeat: Perform the exercise continuously, aiming for a consistent and controlled pace.
Tips:
- Maintain proper form throughout the exercise to prevent injury.
- Engage your core muscles to stabilize your body during the movements.
- Land softly when jumping to reduce impact on joints.
- Modify the exercise by omitting the push-up or adjusting the pace based on your fitness level.
Variations:
- Modified Burpees: Step back and return instead of jumping, perform a knee push-up, or eliminate the jump at the end for a lower-impact variation.
Burpee Variations: Experiment with adding variations like adding a tuck jump at the end, a burpee with a 180-degree jump, or a dumbbell burpee by holding weights
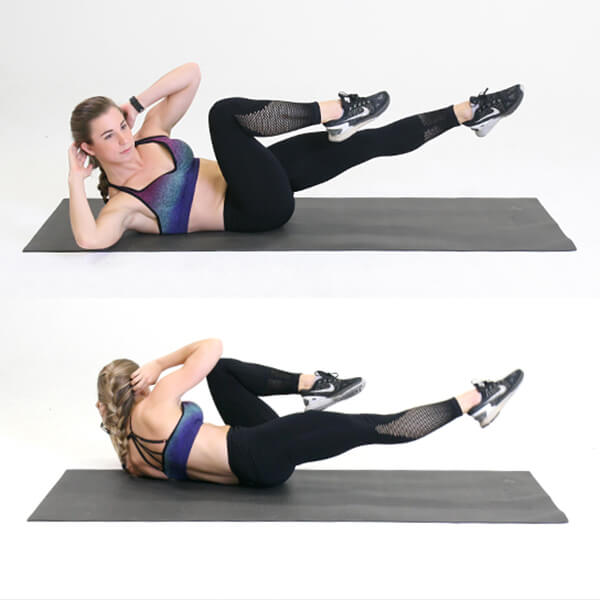
10. Bicycle Crunches:
- Targets: Abdominal Muscles, Obliques
- How to: Lie on your back, bring opposite elbow to the opposite knee while extending the other leg out, simulating a cycling motion.
Notes:
- Warm-up for 5-10 minutes before starting the workout to prepare your muscles.
- Maintain proper form throughout each exercise to prevent injuries.
- Stay hydrated and listen to your body; modify exercises as needed based on your fitness level.
Source: Admin compiled from the Internet